Showing posts with label tech. Show all posts

Tuesday, July 28, 2015

iPad Research

Hi friends! Jessica from Mrs. Plemons' Kindergarten here for this weeks tech tip. I wanted to share my favorite tricks for using iPads as a tool for student research.  (Some of these tips can be used without iPads in the classroom on a desktop computer, laptops, or other tablet)

Before I decided to stay at home with my baby girl, my school district was moving towards a more inquiry based approach to teaching content.  We often had students engaged in different projects requiring them to investigate and find information on their own.  Yes, even in Kindergarten! It can be kind of scary to send kids off to conduct research not knowing what they may encounter, especially on the internet. So here are some things that have helped me make the most of research while teaching students independence and embracing their curiosity.

1. Conducting a Web Search
  • Teach students to type their question into a search engine
  • Have students add "for kids" afterwards 
  • This will bring more relevant results and be less likely to lead them to inappropriate content
2. Image Search
  • Students can learn a lot from pictures!
  • Allow students to do an image search (if it is appropriate for their question)
  • Use Google Images and be sure students use "for kids" again to filter content
  • Alternatively you could have students search their topic on a stock photo site such as Shutterstock or Dollar Photo Club (even without a subscription you will be able to see image results)
3. Use the iPad Dictation Tool
  • This will make searching the web so much easier and faster for young students with limited typing and spelling abilities!
  • Students simply click the search bar in Safari, then tap the microphone button and ask their question. (e.g. How do bees make honey? How many different kinds of penguins are there? What machines do apple harvesters use?) 
  • Poof! Results just like that!
4. Use the iPad Text to Speech Option
  • Turn on the text to speech option so that students can have web pages and other text read to them.
  • Go to Settings > General > Accessibility > Speech Selection
  • Slide it to "on" then choose the speed you'd like the text read
  • You can also turn "Highlight" on so that the text will be highlighted as it is read aloud
  • Teach students how to highlight a word, sentence, paragraph or entire page of text.  When you have the text highlighted you will now have the "Speak" option along with the other options such as copy and define.
  • The voice is a bit robotic, but you no longer have to answer "what is this word?" 127 times during research time (total game changer in a kindergarten class full of emergent readers!)
5. Other Websites/Apps that may be helpful
  • Brain Pop Jr.
  • NSF Science 360
  • Science Kids
  • Watch Know Learn
  • iTube List (This is a FREE App that you can use to search You Tube playlists of videos regarding a topic. I usually find a set of videos and load it for the group to view so that I know the content is appropriate.  They cannot click to other You Tube videos and there are no advertisements. You can set up parent controls so they cannot even search without your code.
6. Use QR Codes
  • Download a FREE QR Code reader
  • Create QR Code links to content specific for your topics of study
  • QR codes can be generated for free on many different websites.  Here is the one that I like for it's simplicity: https://www.the-qrcode-generator.com/
For more help with creating and using QR Codes you can check out my post here:
Happy researching!

Thursday, July 2, 2015

Editing a Document in Adobe Reader

Editable resources are all the rage right now and why not?!?!  Being able to edit resources to meet your specific teaching needs and your students' learning needs is beyond amazing! It can get a little tricky since there are multiple ways to edit products you purchase from TpT.  And, let's face it, sometimes the editing process just doesn't work as smoothly as you would like.

Today, I am going to share with you so tips on how to edit an 'editable' product using Adobe Reader {Note: this will only work on products that the seller has made editable for Adobe Reader, not Powerpoint}.  Let's get started by editing a Daily Schedule from my TpT Store...

First, purchase the full product or download a sample {here} to practice along with this tutorial...
Second, check the store or product description for any addition information regarding editing.  {Note: some sellers may include information only within the product}
Third, make sure you have the most recent version of Adobe Reader.  If it has been a while since you have updated Adobe on your computer, head to their website or simply google 'Adobe Reader' and install the newest version...
Download and install the fonts used in the product.  If you don't have the information for the fonts the seller used, feel free to ask them in the Q&A section on their TpT page...
Open your document and look for text that you want to edit, select, delete and change the text...
Once you have editing all the text you would like, print the document.  {Note: You will not be able to save your edited version unless you own Adobe Pro} 
Editing in Adobe Reader is a quick and easy way to create product to meet your own specific needs easily!  To find more editable products check out Mrs. Jones' Creation Station on TpT!

Tuesday, June 16, 2015

DIY Tagul Clouds

Happy Techy Tuesday everyone! It's Robin from Class of Kinders, here with a little creative way to use technology to create a gift for your kiddos. Today I want to share something that I did leading up to the last week of school using a website called: tagul.com. You can easily sign in with a Goggle, Twitter or Facebook account. My students have spent time all year learning about character traits. So, I decided to use that background knowledge to discuss character traits of friends in our classroom.  We began by brainstorming tons of character traits. They came up with words like hard working, friendly, playful, courageous, smart, and creative! Once we came up with a chart full, I asked them to think about these words and each one of their classmates. I gave each student a simple 3 column grid. The first column was for a classmates name. The second column and third column were for two character traits that described them. Students walked around the room and paired up with each friend and said two character traits to them and even explained why - which someone pointed out - were just like compliments. (Yes, we were ONLY focusing on the POSITIVES for this activity!) After they paired up and gave their compliments, then they wrote those two words for each classmate on the grid. Afterward, I collected them.  I took them home and went through each one to find the character traits that popped up the most for each friend. For example: many children wrote that Emma was: smart, creative and helpful so I typed in "Emma" along with words: "smart," "creative," and "helpful" in the website I mentioned earlier: tagul.com
After entering the words in the top blue box, I played with the different settings: shapes, fonts, layouts and colors (clicking visualize each time)  until I got exactly the one I wanted for each student. Then I printed it in color.
Now, I did have to adjust the printer setting so it would print a little smaller (75%)  because I found these cute little colorful frames at Walmart.com for a little over a dollar. They fit perfectly inside!!!
So there you have it! A gift for each student made by you and their classmates. I do have to say, the kiddos were so excited when I gave them out the last week of school. They ooooooh'ed and aaaaaaaaaah'ed over each one.  Seriously! This went so well, it will totally become an activity we do each year, leading up to the last day of school.

Thanks for getting "techy" with me today… :-)


Tuesday, May 5, 2015

Aurasma in the Classroom

I would like to share with you an awesome App called Aurasma! Aurasma can be use as a QR code, but you can use your own images (Auras)!


I used it in my classroom as a Math Center and my kids LOVED it!! I made several Math story problems cards & another set of card with the answers. I used the story problem cards as my trigger images and the solution cards as my Auras.

At the Math center, my students read their story problem and used the different strategies learned in class to find the solution.


Later they used the Aurasma App to check their answer! They were amazed when the solution showed up 3D style! This center is the FAVORITE one in my classroom!


I made my own cards, but you can use any color image, even pictures made by your students! To create you own AURA click {HERE}. Your students are going to love it!

Have fun!


Mynda Rivera (B is for Bilingual)
Blog - TpT - Facebook - Pinterest
PK-2 Two-Way Dual Immersion
Texas, USA

Tuesday, April 21, 2015

ChatterPix Kid

 Hey guys! Julie here from Big Ideas for Little Hands. We love using technology in our classroom and I am always looking for fun new ways to incorporate technology into the classroom. 

It's been pretty easy to incorporate technology into Math and Reading with fun apps and online games. The struggle was how do I get technology into my writing time. The answer was this amazing app that I found, ChatterPix Kid.

https://itunes.apple.com/us/app/chatterpix-kids-by-duck-duck/id734046126?mt=8 

We have been practicing writing stories during Writer's Workshop. Once the kids were done with their stories, I had them draw a picture of the main "character" of their story. These stories were information stories so they drew a picture of what they were inform the readers about. 

Once they drew their picture, I quickly snapped a picture of their drawing using the app. Then, on the app, you draw a small line where the mouth is. This will allow the picture "to talk." 

Once you have a mouth, the app will count down and the students will record their stories when it says "Go." Then you hit save and you are done. This app makes it so easy to create a talking picture. Once I showed my kids how to use it, they were able to do it on their own without my help! Perfect!


Come take a look at a few of our stories my kids created!


So simple to incorporate and a great way to motivate students to write. At the end of each week, the students that have finished their stories and created a video have a chance to share their video with the class. Definitely a highlight of the week! Head over to download the free app and let your kids' imagination run wild while they write and create!

~*~Julie~*~
http://bigideasforlittlehands.blogspot.com/

Tuesday, April 7, 2015

A Beginners Guide to Using Keynote in Your Printed Documents

Hello Friends!
This is Cindy from Kinderkay Love Those Kinders and I am excited to be a part of this collaborative blog! I thought I would tell you a little bit about myself and then share a tutorial that I made showcasing some of the things that I have learned while using Keynote.

First of all, when people see my blog and TPT name as Kinderkay, they assume that my first name is Kay, but actually my first name is Cindy and my middle name is Kay. It was the idea of my kids to use my middle name with Kinder and it stuck! :)

 I have taught kindergarten for 20 years - yep - 20 years! Whew! That even sounds like a long time to me! But there is something about kindergarten that I love; despite the fact that over these 20 years, kindergarten skills have turned into first grade skills. One of the things I love to do is helping kids realize that they can draw and create anything! We teach thematically in my kindergarten, so my kiddos create booklets that they illustrate and take home to share with their  families. I am a firm believer that kids learn best when they take an active role in their learning. Here is an example of a page from their Earth and Space booklet...


I am the Mom of 3 grown kids - one of them married! My husband is a corn and bean farmer with a few head of Hereford cattle.


I love gardening, sewing, and reading! I love lakes, shopping in quaint shops, and cooking with WHOLE food..... and I am a Catholic School teacher. I love sharing my faith with my little ones. It brings me much joy.

When I was asked to be a collaborator on this blog and I saw that one of our days was titled "Techy Tuesday", I decided that Tuesday would NOT be one of my blogging days as I am NOT a techy person......But one evening as I was visiting with some of my teacher friends on Facebook, I happened to mention that I was using Keynote to create a document. All of a sudden, I had quite a few questions about how to use it and someone suggested that I write a tutorial about what I had learned. That got me to thinking about how nice it would have been for ME to have had a tutorial to go to when I was just learning Keynote; one that was simple to follow and understand. So, here I am writing my first post on "Techy Tuesday" and  I am still shaking my head over it!


I use Keynote A LOT when I create my documents; mainly because I feel that it gives me more latitude towards creativity.  Also, most new Macs come with Keynote installed rather than Power Point, so I think it is a good thing to have a working knowledge about how it works! I really like Power Point, too, so many times when I am creating documents, I am copying and pasting from one format to another.

So.... after many tries, this is very "untechy" person is sharing with you a video tutorial on what to do if you are just beginning to use Keynote!


Until next time!
http://lovethosekinders-kinderkay.blogspot.com/

Tuesday, March 31, 2015

Skype

First of all, I want to take a minute to introduce myself.  My name is Jessica Plemons from Mrs. Plemons Kindergarten, and I’m so happy to be one of the members of this fabulous new blog iTeachKinder!    


I taught for 7 amazing years mostly in Kindergarten, but have also taught Head Start and 1st grade.  I just love kindergarten because there is something special about their excitement for learning and seeing those little light bulbs go off every day!  I have always poured every ounce of energy I had into teaching so when I found out my husband and I were going to be having our first child, it was difficult for me to figure out how I was going to be the teacher and mommy I wanted to be.  I decided I just couldn't do both at 100%, so I decided to start a new adventure in teaching as a stay at home mom.  Although my classroom is now my home, and I have only 1 student, I am loving my time at home teaching my sweet girl.  I'm thankful that I still find time to create resources for the classroom, and glad that TPT allows me to share those resources with classroom teachers all around the country! 


Well, today I wanted to share with you one of my other favorite ways to connect with people across the country or even around the world. And that is Skype! 
I don't know about you but I always LOVE getting new ideas for using technology in my classroom.  A few years ago I had a huge light bulb moment and started brainstorming all of the ways I could use Skype in my classroom.  Some of these I have tried and some ideas got put on the shelf for a while since the most Skype action we see around here these days are weekly chats with the grandparents where Madelynn tries to steal the computer and gives them some serious close ups of the inside of her mouth, LOL.

Do you Skype? If not it is SOOO easy to set up an account, and best of all it is absolutely free.  Seriously. You can video call anywhere, even Antarctica! {okay, I'm getting ahead of myself} 

Sign up for your free account here. Then you will need to download the app on your computer, tablet or even your phone.  Whatever you have available in your classroom with internet access. I find the best way to get the whole class engaged is to connect the device to a projector, but you can have the class gather around your computer or even have small groups Skype in rotations.  That's it, now you just need to find people to Skype with! 

The ideas are endless...but here are 10 of my favorite classroom ideas. 
What a fun addition to an author study in your classroom! My school actually participated in the One Book, One School program where everyone in the school received the same book.  We all read it and in the end we had the opportunity to Skype with the author in our auditorium with our whole school! We had students ask questions, and the author talked to students about her ideas and how she decided to become an author.  It was an amazing, authentic and memorable learning experience to say the least. Most authors have a website with their contact info, and you'd be surprised how happy they are to talk to you!
 Similar to talking to an author, wouldn't it be fun to chat with your favorite illustrator.  This one was on my to do list as well.  Imagine Eric Carle or Lois Ehlert conducting an art class with your students in paper making and cutting to create illustrations.  Or David Shannon leading a directed drawing of his namesake character. It'd be my dream come true, #teachernerdalert.
 How often do you have an amazing idea for a field trip only to find out it is cost prohibitive, too far away, or otherwise not accessible for your students?  Skype can bring the field trip to you! I've had friends skype with fire fighters in their fire station, performers backstage at a theater, and health care workers show how they take and develop x-rays.  The ideas are really limitless here, and I love that you can go places that your class may not be allowed to go in person.
This one is kind of similar to taking a field trip except that the focus is more on the one person talking about a specific topic instead of showing around their workplace. Maybe you are learning about weather and you are able to contact a meteorologist in your area willing to give a presentation about weather instruments. Or maybe you are studying insects and an entomologist is willing to talk to your students about the bugs they study. Guest speakers could even be parents reading a story to the class! Again use your imagination and I'm sure you will come up with some amazing experiences for your students.
How many classes get the chance to take a trip to Antarctica to study penguins? My guess would be a big fat ZERO.  Well I decided it would be so COOL {pun intended} to have my students take a trip through the computer to this frozen land. I contacted a penguin scientist through the website  http://www.penguinscience.com/ and low and behold I found a wonderful woman studying penguins in Antarctica willing to talk with us and show us around her little home in the tundra. Here are a few pictures of this awesome day in my classroom. Sorry they aren't the best quality, I was a little caught up in the moment and almost forgot to take any pictures at all!


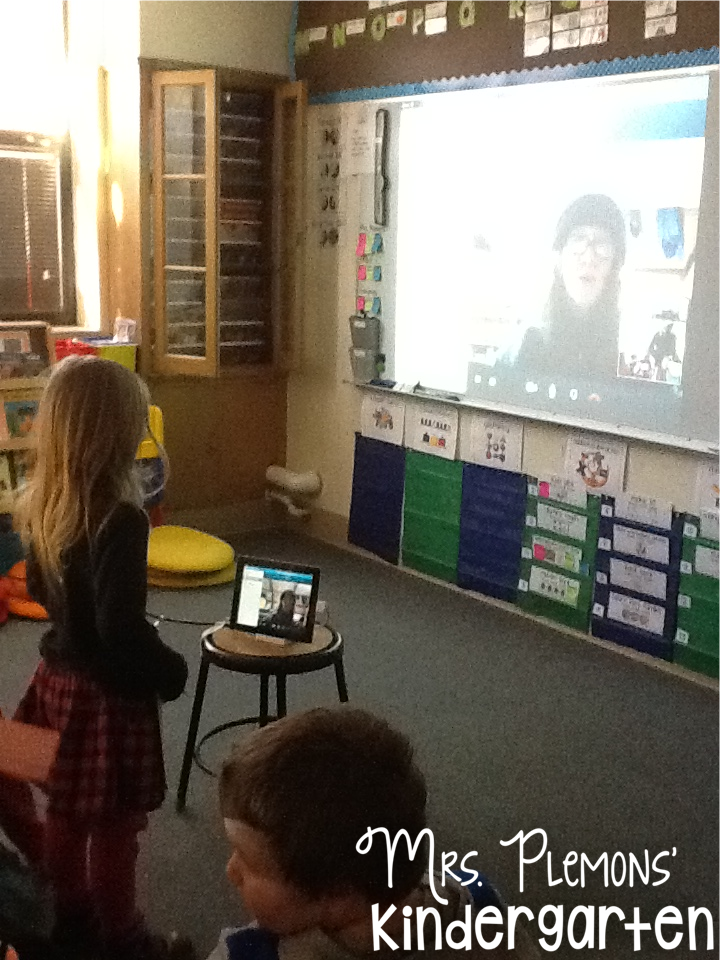
Okay so you may be thinking "How is this any different than a guest speaker?"  I guess you could say they are pretty darn close to the same thing, but I think they are slightly different because with an interview I have my students prepare much more ahead of time!  If you look closely at our Skype session with the penguin scientist, the kiddos have clipboards for their notes, but also questions they'd like to ask.  We were in the middle of an Antarctica inquiry project and the students had been researching for weeks so they listed questions they still weren't able to answer from their reading and other research in hopes that she could answer them.Nothing like authentic information from the source!! Think about topics of study in your classroom and how students could interview an expert to learn even more about a topic.
 Think pen pals in video form!  You can find english speaking classrooms all over the world through Skype in the Classroom that are looking to connect with others. Do you teach in a bilingual classroom or have ESL students? What a great way to connect to other native speakers! There is even an awesome collaborative game that teachers using Skype created called "Mystery Skype" where two classrooms are matched up and they try to guess the location of the other by asking questions. Super engaging way to integrate geography, history, math, science, and languages.
 I LOVE using readers theater in my classroom and there are a million fun resources out there for these types of fluency scripts. Wouldn't it be great to have students perform these readings via skype for other students, classes, or even parents? Or maybe you have a school performance or event that some parents aren't able to attend. They could skype in and feel like they are a part of the experience. I hold a muffins for moms and donuts for dads celebration every spring for Mothers/Fathers day and there are always a few parents that can't come.  If there are parents that can't get out of work to attend, maybe they could skype in and be present via iPad.  I'm sure they wouldn't want to miss out on their child's sweet singing and dance moves if they had the option!
We all know teachers are constantly looking for ways to supplement their salary, one of which being tutoring. I know many teachers especially in the upper grades that offer extra help through email or even private Facebook groups as well.  Why not use Skype to help the visual learners that just need you to walk them through an activity one more time all from the comfort of your own home! This would be a great option to connect with a student that may be out for an extended period of time as well due to travel or illness.
Lastly this one is less about instruction and more about relationships with parents.  We all know how frustrating it is when we can't meet with parents at conference time. So consider using Skype as an option for parent-teacher conferences when the parent simply cannot come in to meet with you.  Maybe one parent travels for work and they'd both like to be present. Or it happens to fall on the one night they have 7823 other things to do.  The great thing about Skype is that parents can connect anywhere they have internet access.  For some parents offering to meet over their lunch hour, from the comfort of their office is just too easy to say no to!

I truly hope that you can find some valuable ways to use Skype with your students, and I would LOVE to hear about it! Please share below, or better yet take pictures and share with me here on Facebook or Instagram!